Current Page: Home > Mac Apps > Super Denoising > basic adjustments
Current Page: Home > Mac Apps > Super Denoising > basic adjustments
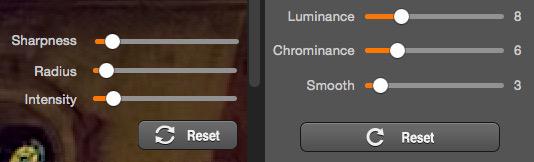
Step 1: On the left bottom of the editor window, you will see the setting for Luminance, Chrominance, Sharpness, etc:
Explanation:
Noise is composed of two elements: fluctuations in color and luminance. Color or "chroma" noise is usually more unnatural in appearance and can render images unusable if not kept under control.
Luminance deals with the actual brightness levels of the different colors.
Sharpness describes the clarity of detail in a photo, and can be a valuable creative tool for emphasizing texture.
Step 2: Make the desired adjustments. Here are a few tips for using the slider controls:
Chrominance noise is where you see color fluctuations and luminance is where you see light/dark fluctuations. Generally, you'd get more aggressive with the luminance noise as the luminance noise looks more like film grain while Chrominance noise looks more unnatural (more digital like).
NOTE: Luminance, Chrominance, Smooth, Sharpness, Radius, Intensify filtering setting automatically adapts to the different noise levels.
Noise reduction should always be performed before sharpening, since sharpening will make noise removal less effective.
NOTE: To adjust Luminance, Chrominance and Sharpness individually, simply click on whichever of those you want to adjust.
Step 3: Use the “Reset” buttons at the bottom to undo your changes.
To reset all of the adjustments made to the Luminance, Chrominance, Sharpness, just click on the “Reset” button. The “Reset” button can be found on the bottom right of Super Denoising. It will be all set back to default setting when we click on “Reset.”
Super Denoising Quick Guide: Import an image; Pan, zoom, and scroll
Make adjustments (Luminance, Chrominance, Sharpness)


